Introduction
Async UI is a UI framework implemented for the web platform. Write your UI in Rust, compile to WebAssembly, and run in web browsers.
Async UI has a new and unique design, leveraging the async features of Rust to build UI (more on this in the design chapter). We are still exploring the countless patterns possible under this design. No idioms or opinionated conventions have been established yet. Let your imagination run!
Other Resources
- A quick overview of the library is available in the README.
- Documentation is available here on docs.rs.
- Hosted demos are available here.
Preparations
This chapter goes over what you need before you can start writing UI code with Async UI!
Note on Environment
The tool installation and project set-up steps are written for Linux and have only been tested on Linux.
They should work on MacOS and Windows too. But if you're on those platforms, please don't just copy paste commands! pay attention to shell output to make sure no unexpected errors come up.
If an error (or any other breakage) comes up, please open an issue!
Backgrounds
Async UI itself is quite easy to learn! But there are some prerequisites before you start: you need to know Rust, Async Rust, and the Web API. These are no small things to learn. However, all three are highly applicable. They will be useful even if you don't end up using Async UI.
Rust
If you don't know Rust yet, the Rust Book is a good place to start!
Async Rust
You should know
- what
async/awaitdoes in Rust - what the Future trait is
- how to run multiple Futures concurrently (i.e. "joining" Futures)
Mastery of manual Future implementation, Pin, or pin-projection is
not required for using Async UI.
If you don't know Async Rust yet, or want to brush up on your knowledge, the Async Book is a great resource. Chapter 1, 3, and 6 of the book cover most of what you need for working with Async UI.
Web API
Async UI exposes most of the Web API. Make sure you know some HTML and
JavaScript. To start with Async UI, you only need the basics:
how to get the text value in an <input>, how to disable a <button>, etc.
The MDN Web Docs is a good reference for the Web API.
Installating Tools
Rust for WebAssembly
Install Rust for wasm32-unknown-unknown (the browser WebAssembly target)
rustup target add wasm32-unknown-unknown
wasm-pack
wasm-pack is a tool for conveniently building WASM application. Install it by one of these options
# curl the binary
curl https://rustwasm.github.io/wasm-pack/installer/init.sh -sSf | sh

# or install via cargo (will compile from source)
cargo install wasm-pack

# or use npm/yarn
npm install -g wasm-pack
A Web Server
You need a web server capable of serving the WebAssembly MIME type. If you don't already have one, you can get microserver.
cargo install microserver
Project Setup
Skip by Cloning from Template
If you want to skip all the setup steps below, simply clone the template.
git clone TODO TODO TODO
Setting Up an Async UI App
An Async UI project is just a Rust project.
cargo new --lib guide-project
cd guide-project
Now you need to set up for WASM.
Modify your Cargo.toml as so
[package]
name = "guide-project"
version = "0.1.0"
edition = "2021"

# 👇 Add this section so that your app can be compiled to WASM
[lib]
crate-type = ["cdylib"]

[dependencies]
# ...
Now add Async UI as a dependency. You'll also need wasm-bindgen.
I also recommend adding a utility crate for working with Futures. In this tutorial I will use futures-lite, but feel free to use futures instead if you want.
# ...
[dependencies]
async_ui_web = "0.2.0" # 👈 Async UI
wasm-bindgen = "0.2.87" # 👈 For interfacing with JavaScript
futures-lite = "1.13.0" # 👈 Helper
You also need an HTML "boilerplate" for the WebAssembly.
Create a file index.html in your project directory (not inside src/).
Put in the following content.
<!DOCTYPE html>
<html>
<head>
    <meta content="text/html;charset=utf-8" http-equiv="Content-Type" />
    <meta name="viewport" content="width=device-width, initial-scale=1" />
</head>
<body>
    <script type="module">
        import init from './pkg/guide_project.js';
		//                      👆👆👆
		// change the import if you put in a different name when doing `cargo new`

        init();
    </script>
</body>
</html>
Almost there! Now we'll add an entrypoint for our application.
Open your src/lib.rs and put in the following content.
#![allow(unused)]
fn main() {
#[wasm_bindgen::prelude::wasm_bindgen(start)]
pub fn run() {
    async_ui_web::mount(app());
}

async fn app() {
    // UI code goes here
}
}
Now run it!
wasm-pack build --dev --target web && microserver
Open your browser at localhost:9090 to see the result. You should just get an empty page (after all we haven't put in any UI code yet). Check the console to make sure there are no errors.
Building the UI
This chapter describes how to put things on the screen. We'll cover how to make UI elements, and how to arrange and nest them.
Some Terminology
We'll be talking about components and elements. Let's define them first.
Element
An element is an HTML node. For example:
- A
<button>is an element. - An HTML Text Node is an element.
- A
<div>...</div>is an element.
Component
There is no fixed interface for what a component looks like in Async UI.
The term "component" will be used to refer to any piece of code that can be used to put some UI elements on the screen.
By the end of this chapter, you will see some common forms of components.
Your First Component
Before You Start
Make sure you have the project set up as per Project Setup.
Putting Something on the Screen
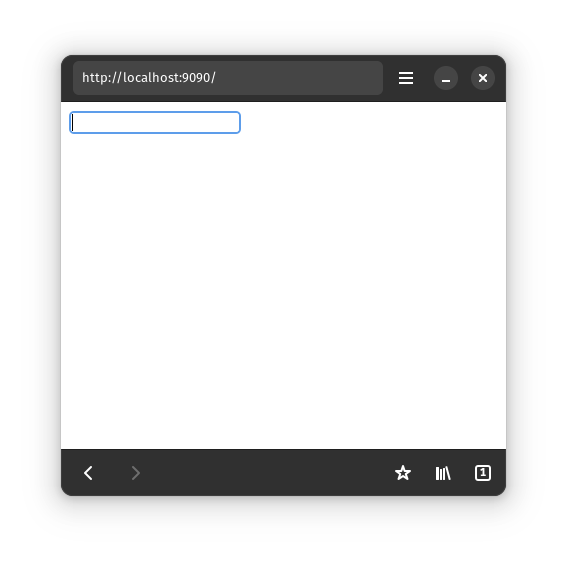
Let's put an <input> on the screen!
	// src/lib.rs

    use async_ui_web::html::Input; // 👈 import the Input component

    // 👇 this should be the same `app` function in `src/lib.rs` from the project setup
    async fn app() {
        let my_input = Input::new();
        my_input.render().await;
    }
Now run the application again
(wasm-pack build --dev --target web && microserver, as described in the
Project Setup),
you should see an empty input field.
Extracting it into a Component
Let's extract that single input field into a component. We'll make the simplest form of component possible: an async function.
	// src/lib.rs

    // 👇 This is your first component 💯
    async fn my_input_field() {
        let my_input = Input::new();
        my_input.render().await;
    }

    async fn app() {
        my_input_field().await; // 👈 use the component you made
    }
Building Nested HTML
In the previous subchapter, we were able to render
<input />
Let's do something more complicated. Let's render
<div>
	<input />
</div>
use async_ui_web::html::{Div, Input}; // import Div and Input components

async fn my_input_field() {
    let div = Div::new();
    let input = Input::new();

    // render the UI!
    div.render(
        input.render(), // input is inside the div
    )
    .await;
}
Notice that there is only one .await in the example above.
// ❌❌ this wouldn't work
div.render(
	input.render().await
	//             👆👆
	// this await above is incorrect
).await;
It is very important to understand why using two awaits here is incorrect.
The two concepts behind this rule are core concepts in Async UI.
.render(_) wraps its argument Future
The signature of div.render(_) is
fn render<F: Future>(&self, c: F) -> impl Future<Output = F::Output>;It takes a Future object and returns a "wrapped" Future object.
The new Future places a <div> on the screen, and if the inner Future
put anything on the screen, that thing will appear inside the <div>.
Our input.render() is a Future that puts an <input> on the screen.
We wrap it with div.render(_), giving us
<div>
	<input />
</div>
UI Futures are long-running
input.render() returns a Future object that never finishes.
If we await it, our code would just be stuck there.
Why does the Future never finish?
The
<input>element stays on the screen for as long as the Future is running. We wouldn't want the element to suddenly disappear!In later chapters, we will learn how to remove rendered elements.
Does
div.render(_)also never finish?
div.render(_)finishes when the inner Future finishes. This is why we say.render(_)"wraps" the inner Future.In our case, though, the inner Future never finishes anyway
Why does
div.render(_)take an argument whileinput.render()doesn't?Per the HTML spec,
<div>elements are allowed to have children, while<input>elements are not.
All the HTML
Let's look at some more ways to build HTML structures with Async UI.
Empty <div>
The previous subchapter ended with a note that <div>s can have children,
but <input>s cannot.
Still, it is perfectly fine to have <div> without children.
<div></div>
The code to do that would be
#![allow(unused)]
fn main() {
use async_ui_web::NoChild; // 👈 new import!

async fn just_div() {
    let div = Div::new();

    div.render(NoChild).await;
}
}
Here, NoChild
is a unit struct that implements Future. It puts nothing on the screen,
and it never finishes (just like input.render()).
Text
We can also render HTML Text Nodes.
There is a trait that implements .render() on &str.
#![allow(unused)]
fn main() {
use async_ui_web::shortcut_traits::ShortcutRenderStr; // 👈 new import!

async fn hello_world() {
    "Hello World".render().await;
}
}
The trait implementation is based on the Text component. You can use that manually too (the next chapter will touch more on this).
Other Elements
Div, Input, and Text Node are only three components in Async UI's suite of HTML components.
You can see the full list here.
All of them have the same form:
a struct that can be constructed by Type::new()
and can be rendered with the async render() method.
Quiz
How would you make a component that renders the following HTML?
<div>
	<button>Hello World</button>
</div>
If you haven't been running examples along the guide so far, now is the time 😤😤😤. Write out your answer to the quiz. Run it in your browser to check.
Click to view solution
#![allow(unused)]
fn main() {
use async_ui_web::html::Button;

async fn quiz() {
    Div::new()
        .render(Button::new().render("Hello World".render()))
        .await;
}
}
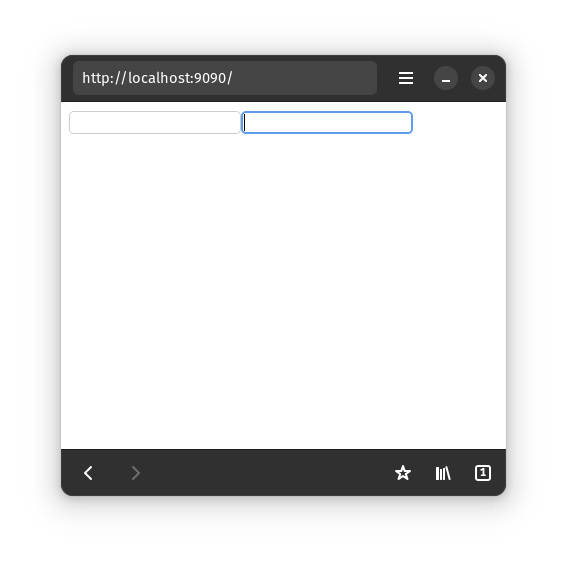
Making Siblings
We've so far seen how to render HTML elements and nest them.
But how do we put elements side-by-side?
<input />
<input />
In the Building Nested HTML subchapter, we learned that UI elements only stay on screen for as long as their corresponding Future is running. Thus, if we want two elements on the screen at once, we'll need to run two Futures concurrently.
To run Futures concurrently, we "join" them. The join function takes in multiple Futures, and return a single Future. When awaited, the returned Future will drive the input Futures to completion and return all their results.
#![allow(unused)]
fn main() {
use async_ui_web::{html::Input, join}; // 👈 get the `join` function
async fn two_inputs() {
    let input_1 = Input::new();
    let input_2 = Input::new();
    // 👇 join takes a tuple of Futures
    join((input_1.render(), input_2.render())).await;
}
}
Also, join is not limited to tuples of Futures. You can also pass it an array
or a vector of Futures.
See its documentation
to learn more.
More complicated example
Let's render this HTML
<div>
	<button>Hello World</button>

	<span>1</span>
	<span>2</span>
	<span>3</span>
	<!-- more spans here -->
	<span>98</span>
	<span>99</span>
	<span>100</span>

	<input />
</div>
#![allow(unused)]
fn main() {
async fn lots_of_span() {
    Div::new() // the wrapping <div>
        .render(join((
            // the <button> at the top
            Button::new().render("Hello World".render()),
            // the 100 <span>s, made by joining a vec of 100 Futures
            join(
                (1..=100)
                    .map(|number| Span::new().render(number.to_string().render()))
                    .collect::<Vec<_>>(),
            ),
            // the <input> at the end
            Input::new().render(),
        )))
        .await;
}
}
That code looks pretty complicated ☹️. But we can improve it! We'll split it into small, easy-to-understand parts in the next subchapter!
Components
As mentioned at the start of the chapter, Async UI does not have any specific interface that "components" have to conform to. A "component" is just some piece of code that can be used to render UI.
Here are two common forms of "component"
Async Functions
This code from the previous subchapter is somewhat complicated.
#![allow(unused)]
fn main() {
async fn lots_of_span() {
    Div::new() // the wrapping <div>
        .render(join((
            // the <button> at the top
            Button::new().render("Hello World".render()),
            // the 100 <span>s, made by joining a vec of 100 Futures
            join(
                (1..=100)
                    .map(|number| Span::new().render(number.to_string().render()))
                    .collect::<Vec<_>>(),
            ),
            // the <input> at the end
            Input::new().render(),
        )))
        .await;
}
}
We should split it into smaller parts that are easier to understand.
To do this, we'll isolate two of the Futures into a separate async functions (remember that Rust async functions return Future objects).
#![allow(unused)]
fn main() {
async fn hundred_spans() {
    join((1..=100).map(one_span).collect::<Vec<_>>()).await;
}
async fn one_span(number: i32) {
    Span::new().render(number.to_string().render()).await;
}
}
Our overall UI function is now just
#![allow(unused)]
fn main() {
pub async fn lots_of_span_2() {
    Div::new()
        .render(join((
            Button::new().render("Hello World".render()),
            hundred_spans(),
            Input::new().render(),
        )))
        .await;
}
}
Observe that the components we made are just plain Rust async function. Component functions can do all the things regular async functions can do: take arguments, borrow things, be generic, etc.
Types with Async .render() Method
Components can also come in the form of a type.
#![allow(unused)]
fn main() {
struct HelloWorld;
impl HelloWorld {
    async fn render(&self) {
        "Hello World".render().await;
    }
}
async fn app() {
    let hello_world = HelloWorld;
    hello_world.render().await;
}
}
Calling the .render() method returns a Future. Running that Future puts the UI
on the screen.
You've seen this before! all the HTML components we've worked with -
Div, Input, Button, etc. - are types with .render(_) method.
How is this more useful than plain asnyc functions? It allows us to modify the element, as we'll see in the next chapter...
Modifying the UI
The previous chapter covered how to write Async UI code that produces the HTML structure you want.
In this chapter, we will learn how to modify the UI elements: how to set HTML attributes, how to remove a rendered element, etc.
Using the JS API
JavaScript provide API to manipulate HTML elements. Async UI provides the same API, translated to Rust via wasm-bindgen and the web-sys crate. Anything you can do in JavaScript, you should be able to do here.
Let's start simple: we'll set the placeholder text in a text <input /> field.
#![allow(unused)]
fn main() {
async fn input_with_placeholder() {
    let input = Input::new();
    input.set_placeholder("enter something"); // 👈 set the placeholder
    input.render().await;
}
}
The .set_placeholder(_) method used is from web_sys.
It is implemented on web_sys::HtmlInputElement,
which is web-sys' translation of the same JS API
(x.set_placeholder(y); is equal to x.placeholder = y; in JS).
You can call the method on async_ui_web::html::Input
because our Input derefs to web_sys::HtmlInputElement.
Other Async UI HTML components deref to their web-sys counterpart too. All the methods are listed in the documentation.
Example: Countdown
This example update the content of an HTML Text Node every second.
We'll use gloo-timers
to conveniently access JavaScript setTimeout.
Add this in your Cargo.toml dependencies
gloo-timers = { version = "0.2.6", features = ["futures"] }
Leveraging the Ecosystem
The
gloo-timerscrate isn't related to Async UI, but since it provides an async API, we can use it in our Async UI app very easily.This is one of the strengths of Async UI: it integrates very well with any async Rust code.
Now, for our countdown code
#![allow(unused)]
fn main() {
use async_ui_web::{html::Text, join};
use gloo_timers::future::TimeoutFuture; // nice async interface to `setTimeout`

async fn countdown(mut seconds: i32) {
    let text = Text::new(); // create an HTML text node

    // join two Futures:
    // * one to render the text node
    // * the other to keep updating the content of the node
    join((
        text.render(), // render the text node
        async {
            while seconds > 0 {
                // 👇 Set the content of the text node. This is `text.data = "..."` in JS.
                text.set_data(&seconds.to_string());

                // wait 1 second
                TimeoutFuture::new(1000).await;

                // decrement the count
                seconds -= 1;
            }
            // count has reached zero!
            text.set_data("boom!");
        },
    ))
    .await;
}
}
Note: Our example here is just for demonstration.
For a correct countdown implementation, use setInterval
instead of setTimeout.
The DynamicSlot Component
The previous subchapter covered dynamically updating HTML elements. Now we'll be adding and removing elements.
The DynamicSlot component
provided by Async UI acts like a "slot".
You can dynamically set what Future runs in the slot.
In this example, we will display a button for 3 seconds, display some text for 3 seconds, and then display nothing.
#![allow(unused)]
fn main() {
use async_ui_web::{
    components::DynamicSlot, html::Button, join, shortcut_traits::ShortcutRenderStr,
};
use futures_lite::FutureExt; // for .boxed_local(), which converts a Future to a `Box<dyn Future>`
use gloo_timers::future::TimeoutFuture; // nice async interface to `setTimeout`

async fn show_button_and_remove() {
    let slot = DynamicSlot::new();

    slot.set_future(
        // put <button>I will disappear soon!</button> in the slot
        Button::new()
            .render("I will disappear soon!".render())
            .boxed_local(), // make it dynamically typed so we can put Futures of other types in the slot
    );

    // join two Futures:
    // * one to render the slot
    // * the other to manipulate the content of the slot
    join((
        slot.render(), // render the slot
        async {
            // wait 3 seconds
            TimeoutFuture::new(3000).await;
            // 👇 replace the button in the slot with a text
            slot.set_future("The button is gone!".render().boxed_local());

            // wait another 3 seconds
            TimeoutFuture::new(3000).await;
            // 👇 remove the text in the slot
            slot.clear_future();
        },
    ))
    .await;
}
}
It's not magic
If you're familiar with hand-implementing Futures, take a look at the source code of DynamicSlot.
You'll see that it's no private-API-powered magic; it's just general async Rust code. You can even implement it yourself!
Extra
Can you implement the example above without DynamicSlot?
Hint: there is race,
which is like join, but completes as soon as the first Future completes.
Click to view solution
Let's make a helper function first
#![allow(unused)]
fn main() {
use async_ui_web::race; // 👈 new!
use std::future::Future;

/// Run the given Future.
/// If it is still running after 3 seconds, just drop it and return.
async fn run_for_3_seconds(f: impl Future<Output = ()>) {
    race((
        f,                        // the Future to run
        TimeoutFuture::new(3000), // a Future that waits 3000 ms
    ))
    .await
}
}
And now our main UI
#![allow(unused)]
fn main() {
async fn show_button_and_remove_2() {
    run_for_3_seconds(
        // show <button>I will disappear soon!</button>
        Button::new().render("I will disappear soon!".render()),
    )
    .await;

    run_for_3_seconds(
        // the text
        "The button is gone!".render(),
    )
    .await;
}
}
Lists
We've so far covered how to render many Futures (we rendered 100 <span>s in chapter 1),
and how to dynamically put or remove a Future (the previous subchapter on DynamicSlot).
Now, how do we dynamically insert or remove from a list of many Futures?
Async UI comes with many different list components. They are documented here.
The most recommended list - the one we will use in this guide - is ModeledList.
Each ModeledList has two parts:
- The
ModeledListinstance. This is what you.render(). It knows how to turn each list item into a Future to be rendered. - The data model: ListModel.
This is where the items of the list actually live. It is similar to a
Vec.
Operation is simple: you update the ListModel,
then tell the ModeledList that the data have been updated,
and the ModeledList will figure out inserting new items and deleting removed items.
Example: a Fibonacci list
We'll make a list of Fibonacci numbers. First, let's import things
#![allow(unused)]
fn main() {
use async_ui_web::{
    html::Div,
    join,
    lists::{ListModel, ModeledList}, // 👈 new!
    shortcut_traits::ShortcutRenderStr,
};
use gloo_timers::future::TimeoutFuture;
}
Before making the list, let's think of how we'll render each item in the list
#![allow(unused)]
fn main() {
async fn render_one_item(n: usize, fib_n: u64) {
    Div::new()
        .render(format!("The {n}th Fibonacci number is {fib_n}.").render())
        .await;
}
}
And finally, we make the list
#![allow(unused)]
fn main() {
async fn fibonacci() {
    // 👇 create a list that can render numbers
    let list = ModeledList::new(|(n, fib_n)| render_one_item(*n, *fib_n));
    // 👇 create a model that contains the numbers we'll render
    let mut fibo = ListModel::from(vec![
        (1, 1), // fib_1 is 1
        (2, 1), // fib_2 is also 1
    ]);
    // 👇 tell the list to render the numbers in the `fibo` model
    list.update(&fibo);

    // join 2 Futures:
    // * the list
    // * a Future to manipulate the items
    join((
        list.render(), // 👈 render the list
        async {
            loop {
                // wait 1 second
                TimeoutFuture::new(1000).await;

                // 👇 change `fibo`, adding the next fibonacci number
                fibo.push((
                    fibo.len() + 1, // `n` - the index of the next fibo number
                    // compute `fib_n`
                    fibo.iter()
                        .rev()
                        .map(|(_n, fib_n)| fib_n)
                        .take(2)
                        .cloned()
                        .sum(),
                ));
                // 👇 tell the list that the numbers in the model have changed
                list.update(&fibo);
            }
        },
    ))
    .await;
}
}
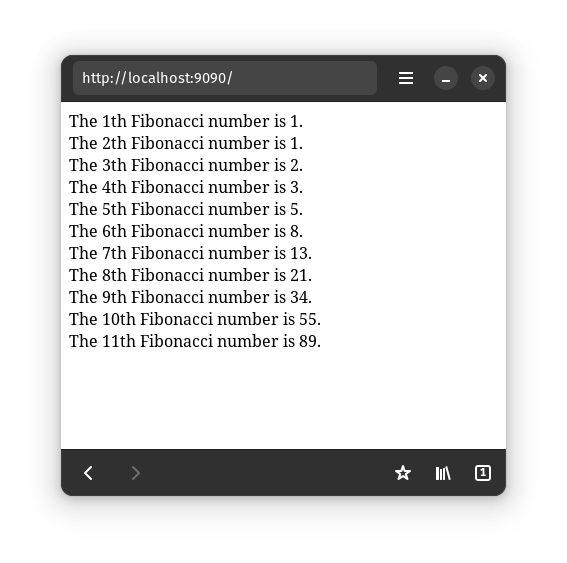
Warning: Our Fibonacci implementation will eventually overflow.
Fixing the incorrect English usage ("1th", "2th", "3th") is left as an exercise for the reader.
Handling Events
Unlike other UI frameworks, Async UI does not let you set event handler callbacks.
Instead, we provide an async API.
Waiting for a user click is no different from waiting for the TimeoutFuture
we used in previous chapters.
#![allow(unused)]
fn main() {
use async_ui_web::event_traits::EmitElementEvent; // 👈 new import!

async fn quick_example() {
    let button = Button::new();
    join((
        // render the button
        button.render("Click me!".render()),
        async {
            button.until_click().await; // 👈 wait for the button to be clicked

            // handle click
        },
    ))
    .await;
}
}
The methods for waiting for events are all named until_*.
They are provided in 3 different traits
-
EmitEvent is implemented on anything that is a JavaScript Event Target. It provides only one method:
#![allow(unused)]
fn main() {
fn until_event<E>(&self, name: Cow<'static, str>) -> EventFutureStream<E>;
}
It listens to event of the given name.
We will discuss what
EventFutureStreamdoes shortly. -
EmitElementEvent is implemented for the Element JavaScript class. It provides methods like:
#![allow(unused)] fn main() { fn until_click(&self) -> EventFutureStream<MouseEvent>; fn until_focus(&self) -> EventFutureStream<UiEvent>; fn until_keydown(&self) -> EventFutureStream<KeyboardEvent>; // ... and more ... } -
EmitHtmlElementEvent is implemented for the HTMLElement JavaScript class (note that this is not the same thing as the
Elementclass). It provides methods like:#![allow(unused)] fn main() { fn until_input(&self) -> EventFutureStream<Event>; fn until_drag(&self) -> EventFutureStream<DragEvent>; // ... and more ... }
Usually, you would just type in the method you want to use, and rust-analyzer will figure out which trait to import for you.
EventFutureStram<E>
The return type of all those methods is EventFutureStream.
Use as Future
As you have already seen in the previous example,
you can await an EventFutureStream. It is a Future.
When await-ed, an EventFutureStream will return the JavaScript Event object that
it listens for (the object is translated to Rust via web-sys;
see for instance web_sys::MouseEvent).
You can, for example, call preventDefault
on the returned event object.
#![allow(unused)]
fn main() {
async fn return_type() {
    let link = Anchor::new();
    link.set_href("https://example.com/");
    join((
        // render the link
        link.render("I'm a link!".render()),
        async {
            let ev = link.until_click().await; // 👈 wait for the button to be clicked

            ev.prevent_default(); // 👈 use the event object
                                  // we called preventDefault so example.com won't be opened
        },
    ))
    .await;
}
}
In this example, notice that we only listen to click event once.
The first time the user click the link, preventDefault will be called and the
link won't be opened. The second time, however, the link will open normally.
If you want to handle the event every time it fires, you can put the code in a loop. Try it! now the link won't open however many times you click.
Use as Stream
EventFutureStream is not only a Future, it is also a Stream. It can be quite convenient to work with it through the Stream API instead of the Future API.
For example, let's use the Stream API from futures-lite.
The crate provides a for_each method for Streams. It is perfect for our use case.
#![allow(unused)]
fn main() {
use futures_lite::StreamExt; // 👈 new!

async fn prevent_default_with_stream() {
    let link = Anchor::new();
    link.set_href("https://example.com/");
    join((
        // render the link
        link.render("I'm a link!".render()),
        // for each click event, `preventDefault` it
        link.until_click().for_each(|ev| {
            ev.prevent_default();
        }),
    ))
    .await;
}
}
Reactivity and State Management
Async UI does not provide reactivity or state management solution. The async API should be flexible enough for you to "bring your own reactivity".
The async_ui_web crate does expose a ReactiveCell
type that provides basic reactivity. However, it is unlikely to be powerful
enough to manage the state of complex applications.
There are, as far as I am aware, two Rust state management libraries out there that provide async API.
Futures-Signals
The futures-signals crate provide reactivity based on "signals". If you're interested, the crate's tutorial explains everything.
X-Bow
Along with Async UI, I have also been working on a state management library.
It's name is X-Bow (because early prototypes were inspired by the JavaScript
MobX library). You can access it's documentation
here.
Extras
The content covered up to here should be sufficient to build any application, but there are a few more things that Async UI provides...
CSS Styling
Class List Shortcuts
You can already do basic styling by accessing your elements style property
(MDN doc,
web-sys doc).
You can also already do CSS styling by setting classnames
for your elements with the classList
(MDN doc,
web-sys doc)
#![allow(unused)]
fn main() {
async fn div_with_class() {
    let div = Div::new();
    div.class_list().add_1("my-container").expect("?!?!");
    div.render(NoChild).await;
}
}
For extra convenience, Async UI provides a few traits to make styling code a bit less verbose.
ShortcutClassList
#![allow(unused)]
fn main() {
use async_ui_web::shortcut_traits::ShortcutClassList; // 👈 new import!
async fn div_with_class_2() {
    let div = Div::new();

    // 👇 `add_class` provided by the trait
    div.add_class("my-container");
    // 👇 `add_classes` for multiple classes
    div.add_classes(["my-class", "another-class"]);

    div.render(NoChild).await;
}
}
There are a few more methods available. View the documentation here.
ShortcutClassListBuilder
#![allow(unused)]
fn main() {
use async_ui_web::shortcut_traits::ShortcutClassListBuilder; // 👈 new import!
async fn div_with_class_3() {
    Div::new()
        // 👇 add classes without putting `Div` in a variable
        .with_classes(["my-class", "another-class"])
        .render(NoChild)
        .await;
}
}
View the documentation here.
Linking CSS
You can already add your CSS content by either
- linking it in your
index.html(with a<link />tag), or - constructing a
<style>element with Async UI.
Async UI provide an extra mechanism that let you write your CSS in Rust file.
#![allow(unused)]
fn main() {
mod style {
    // 👇 Write our CSS here!
    async_ui_web::css!(
        "
.my-class {
	border: 2px solid red;
}
/* Supports any selector */
.flex.my-class:not(:hover) {
	background-color: green;
}
		"
    );
}
async fn div_with_style() {
    Div::new()
        // 👇 the `style::my_class` constant is generated by the macro
        .with_class(style::my_class)
        .render(NoChild)
        .await;
}
}
With this method, you don't have to worry about linking the CSS - it is done automatically by the macro.
The macro will add random postfix to your CSS class names so that you don't have to worry about name collision.
The macro expose those postfixed class names as Rust &str constants you can use.
Framework Design
Design
Basics
- UI as side effect: Rust Future
objects can render things.
- These Futures are long-running. Their UI elements stay on the screen until they are dropped.
DOM
- HTML structure is built by joining and nesting Futures.
- The "base" Future is ContainerNodeFuture. It puts a single HTML node on the screen. It use the described context to insert its node on first poll, and remove the node when dropped.
- The code for joining is based on futures-concurrency, but rewritten to significantly improve performance and reduce allocations.
- We use an implicit rendering context, provided as a scoped thread-local set
for each Future
poll. The context provides the information needed forinsertBefore- The HTML element that the polled Future should insert its own element to. This is the "parent element".
- An ordered map containing all the children of the parent element,
each keyed by a lexicographical "path" from the parent element.
#![allow(unused)]
fn main() {
Div::new().render( // this Div is the parent element for A-F
join((
	A, // path = [0]
	join((
		C, // path = [1, 0]
		D, // path = [1, 1]
		join((
			E, // path = [1, 2, 0]
			F, // path = [1, 2, 1]
		))
	)),
	B, // path = [2]
	Div::new().render( // this Div is the parent of G and H
	join((
		G, // path = [0]
		H, // path = [1]
	))
	),
))
)
}
<div> A C D E F B <div> G H </div> </div>- The "path" is stored as a
SmallVec<[u32; 4]>.
- The "path" is stored as a
- No diffing virtual DOM. Dynamicity is special case (DynamicSlot).
- The event listener EventFutureStream type add a callback to put the event object in a cell and wake its waker. On every poll it the check if there is an event in the cell.
State
- We don't provide reactivity or state management.
- State can be put in Future objects.
- Usually, this comes in the form of variables in async functions.
Scheduling
- The whole app is one big Future.
- A "main" async executor is provided (async-executor). It drives the app Future and can also be used to spawn things.
- The main executor is driven by a hand-rolled "root" executor.
- The root executor
setTimeoutitself to execute when woken.
- The root executor
Comparisons
- The UI-as-side-effect design of Async UI is quite unique, as far as I know.
- Blocking UI (like
alertorMessageBox) technically present UI as side-effect too, but they're not very flexible since they block the entire application.
- Blocking UI (like
- Async UI has long-living async functions and store component state as variables in functions. This approach is similar to Crank.js.
Motivations
Async UI is motivated by the fact that async is an effect system, and in many cases, UI is too.
But that isn't the only possible motive for this framework design. This blog post by notgull describes the same idea of using async for UI, but from a less abstracted perspective.
Future Work: Other Backends
Async UI is unique not in its implementation, but rather in its developer-facing API design.
This design is not at all restricted to working with the web platform. It can be adapted to run on top of essentially any node-based GUI library.
The first implementation of Async UI, in fact, came with two backends: HTML and GTK4. I decided to drop GTK and focus effort on the web backend. Once the implementation for web stabilizes more, GTK can be revisited.
Purely Async GUI
Theoretically, it is also possible to build a library like Async UI without relying on an underlying node-based GUI library at all. Once the UI ecosystem matrues a bit more (good layout engines, good cross-platform APIs, etc.) maybe we can take a shot at it!
LiveView
A "LiveView" implementation (where the Rust code runs on the server and sync DOM updates to the web browser) is possible.
Async UI would fit this model pretty well, since most HTTP server are already async.